Scheduling Deliveries with Lynx
Once you've got the right size tanks in place, minimized the number of Will Calls, and set up the routing method(s) to be used, it's time to actually do the scheduling of deliveries.
Here's how you can do this:
1. Go to the Find a Route screen under the Delivery menu bar.
2. Pick a route.
3. Left-click on  and left-click

4. You will see  as
Lynx refreshes the route.
as
Lynx refreshes the route.
5. Now that the return dates are up-to-date, it's time to filter the stops.
6. Left-click the "Yes" radio button here  , this will allow you to access the
  .
.
7. Left-clicking will bring up
this screen:
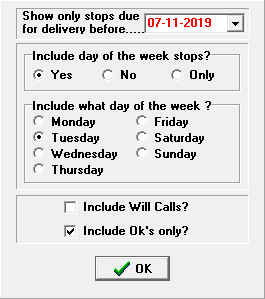
8. Enter a date in "Show only stops due for delivery before" field.
9. Adjust this date until an optimum number of stops (like 25-35) are selected.
10. Then fine tune this list by adding or removing Will Calls, eliminating bad credit customers, and dealing with any other special situations.
If you have Microsoft's Mappoint 2013 installed
11. You can improve your deliveries even further by optimizing the route for your drivers.
12. To do this, left-click on
and then left-click "Plot the most efficient course for selected stops" followed by "Plot the most efficient
course for selected stops on this route."

13. This will bring up a Route Map of all the deliveries on this route.
14. Left-click  to have Lynx
optimize this route for efficiency. After a few seconds you should see the route re-arrange, left-click
the
to have Lynx
optimize this route for efficiency. After a few seconds you should see the route re-arrange, left-click
the  to exit this window and go back to the route screen.
15. Print a delivery list for the driver and/or the tickets for this route (or save to disk if you use the Lynx on-truck system).
16. Repeat this process for all routes to be scheduled.