Generate Tickets for the Selected Stops
Here's how generate a batch of selected delivery tickets for a route. Stops are considered to be
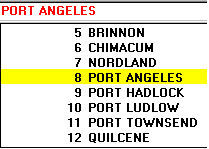
"selected" when they are checked  and only
checked stops will print a ticket.
and only
checked stops will print a ticket.
Printing tickets is done immediately after you have identified tanks due for delivery. After they are generated they may be printed to go with the driver (or not). In either case, the information about each ticket remains in the system to be posted to after the deliveries have been made.
From the Lynx Main Menu . . .
1. Left-click on Delivery.
2. A drop down menu will appear.
3. Left-click on Find a Route.
4. This will display the Add, Change, Delete Routes window.
5. Left-click the  buttons to display a drop-down list of your routes:
6. Left-click on the route containing the stop you're looking for and then
left-click on the  button and this drop-down
menu will appear:
button and this drop-down
menu will appear:

7. Left-click on Generate Tickets and the Generate Tickets window will be displayed.

To select the ticket format you want to use, left-click the

8. Review the data in the following fields:
 . . . . . to make sure the date is correct.
 . . . to include a truck reference with the batch.
 . . . . . to match the
pre-printed ticket numbers.
. . . . . to match the
pre-printed ticket numbers.
 . . . . to include a driver with the batch.
9. Left-click the  button which will generate the individual Tickets
for each selected stop on the route and display them below:
button which will generate the individual Tickets
for each selected stop on the route and display them below:

Only stops that you checked
10. Left-click the  button to preview and/or print the tickets and then left-click
the close button
button to preview and/or print the tickets and then left-click
the close button  to return to the Generate Tickets window.